
Shrovetide – Wide needlewoman! In our today’s article, we will tell you how to make various crafts for the Spring Maslenitsa holiday on your own.!
You can make something really original and interesting not only from plain paper or plasticine, but also from the main dish of this holiday – pancakes! You can also make crafts from various scrap materials and unnecessary gizmos.!
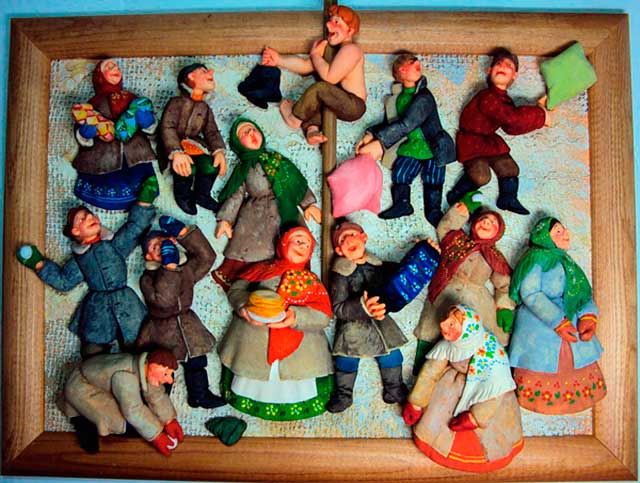
After reading this article, you will learn how to make crafts for Shrovetide with your own hands to school. But more on that later. As it has long been customary, folk holidays in Russia have always been celebrated and are celebrated to this day in the family circle. It is best to choose crafts that can be made by every member of your family. So that everyone can take part in decorating the house. After decorating the house, it is customary to receive guests. Well, as they say, here God himself ordered to prepare something original, tasty and unusual for the invited guests! In this case, all kinds of pancake crafts and original methods of cooking, as well as serving this dish, will come to the place. Besides, it is not pleasant to visit friends empty-handed. To do this, you will have to make some kind of present. Maybe it will be a stuffed animal of winter, or a symbol of the coming spring, the sun. It follows from this that Shrovetide week for us is not a time for various foods, but also for a wide variety of handicrafts. And the child will need to show what can be done at the children’s crafts competition.
Crafts from salt dough for the “Farewell to Winter” holiday
Salted dough is the material that anyone can work with, regardless of experience or not. You can make crafts for school from puff pastry. Do you want to do some craft, but are not confident in your own abilities? Prepare and cut out a template on paper for the future craft. The same applies to different parts of the product. Now we present to your attention a classic recipe for salty dough. It’s pretty simple:
- You must first mix one part flour, one part salt, 0.4 parts water.
- In order to give the color of the craft, after the dough dries, you can paint it, or you can make a colored dough, tint it with some water..
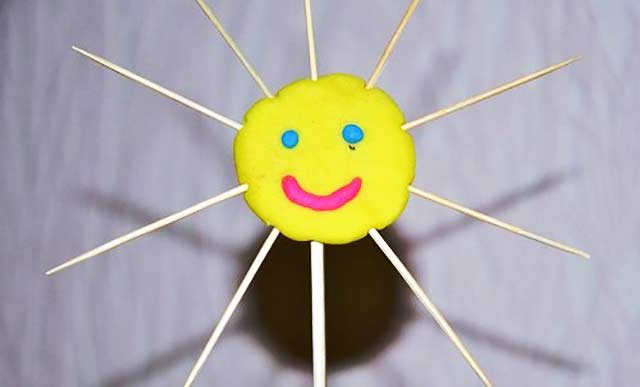
Salted dough sun.
Probably the simplest and most popular craft on the eve of the farewell to winter is of course the sun. Depending on your experience and your capabilities, you can make the simplest version of the craft. If you immediately tinted the dough, then it is better to immediately tint the toothpicks with a matching gouache color..
In addition, you can alternate long beams with short.
Such a sun on a leg will look very original and beautiful together with indoor plants..
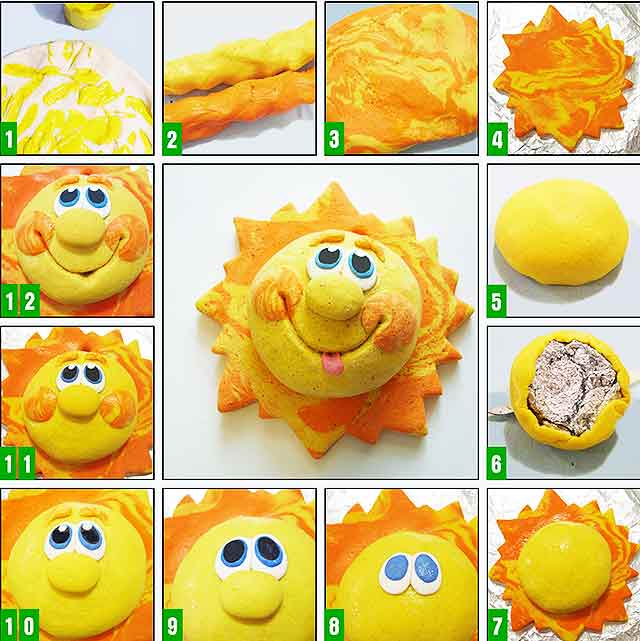
Are you an excellent sculptor? You can try to make a beautiful sun using a paper template for the sun itself. You can get a two-tone sun by mixing yellow and orange dough. If you don’t have a suitable template at hand, then it’s okay! You can simply make it using two squares..
Volumetric compositions.
This article presents crafts on the theme of Shrovetide. A three-dimensional picture on the theme of Shrovetide can be depicted, both in the form of a stuffed winter, and abundant treats or the coming spring. For example, to make a picture – spring is on the doorstep, you will need:
- Several scraps of fabric.
- Salty dough.
- Cardboard or fiberboard for the base.
- Newspaper (you can replace the newspaper with cardboard or thick paper).
- Glue.
- Satin bright ribbons or other decorations.
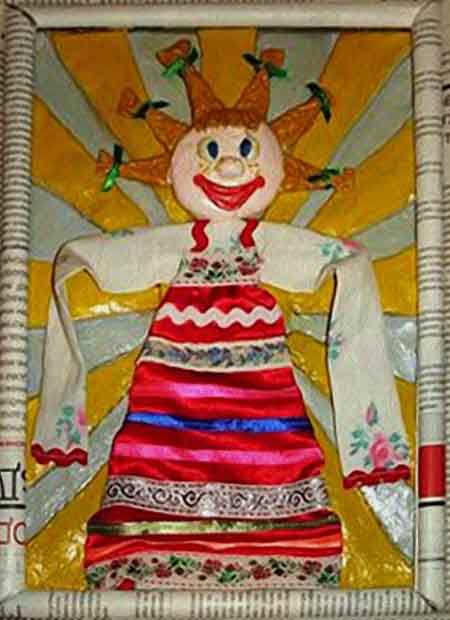
The order of work is very simple:
- First, you need to stick paper on the base, to which your craft will be attached in the future..
- Then you need to sculpt and place on paper parts from salt dough..
- While the dough dries up, you need to start preparing a frame from newspapers or other material.
- Next, you need to embed all the elements of decoration and clothing..
- Then paint the dough with gouache.
- After complete drying, you need to collect the remaining parts of the future craft with glue.
- Since the Shrovetide holiday is a time of plentiful meals, it takes place to cook figurines of a happy and well-fed cat from salted dough..
Interesting crafts from pancakes for Shrovetide: photo
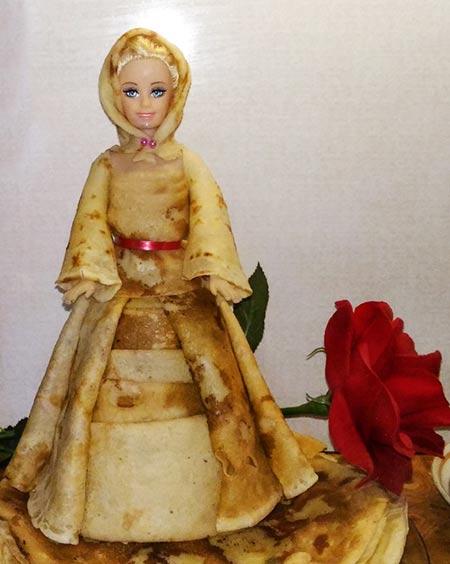
If the Maslenitsa holiday is approaching, then a pancake craft for school is suitable for this occasion. This treat can become not only a delicious dish, but also a great decoration for your table. This requires only your imagination. The simplest pancake craft is a well..
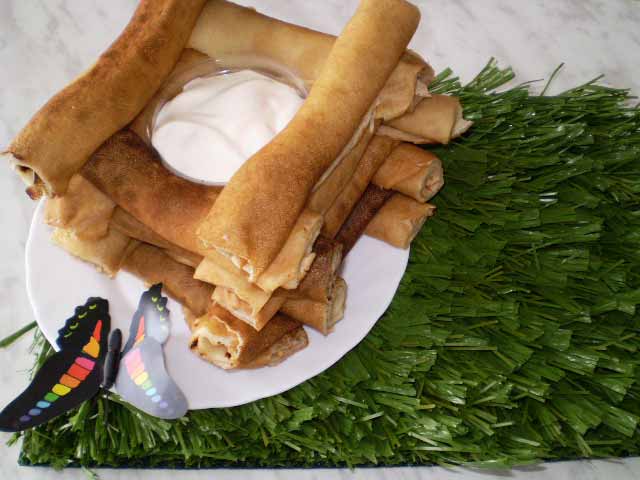
The pancakes should be rolled as tightly as possible and then placed in the required order. And so that your pancake well is not empty, you can put a bowl of sour cream or jam inside it.
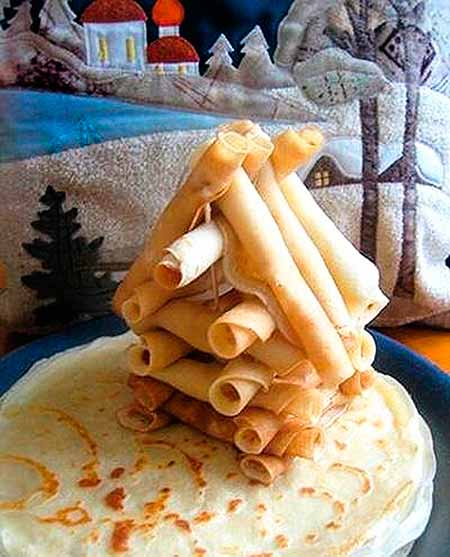
Everyone knows that where there is a well, there is a house. It is also very easy to build. You can secure the pancake rolls with simple toothpicks. And to complement this composition, you can make the mistress of the house herself. You can take a simple doll as its basis, or cut a cone out of paper, which should be wrapped in cling film. As a modern option, a barbie doll may be suitable. You can place the bags filled with filling next to the doll in a separate plate..
There is another option for decorating the festive table – colored pancakes. In the video below, we have provided a detailed recipe for this original colorful dish..
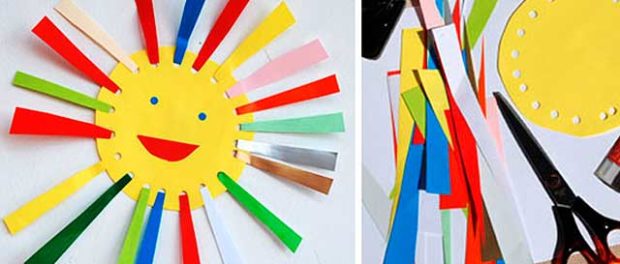
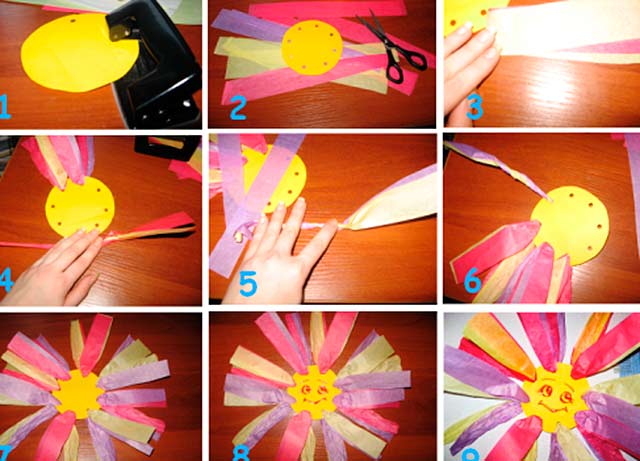
Crafts for Shrovetide from paper to school: master class
If a craft contest is announced at a school or kindergarten, then, as a rule, everyone immediately begins to use paper as a material, since you can do anything with it. But if you want to spend a minimum of your time and make an original craft for school for the fifth grade, then you should make sure if you have everything for this:
- Colored paper (orange or yellow).
- Compact disc.
- Glue.
- Markers or pencil.
- Compasses or round objects of the required diameter.
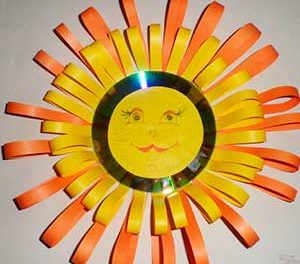
Progress:
- In order for you to get a sparkling sun out of everything described above, you need to: Cut thin strips (1-1.5 cm) from colored paper. Next, they need to be glued into loops..
- Then you need to glue the first yellow row along the edges of the disc.
- All the same will need to be done with the second color..
- Then you need to cut out the face of the sun, somewhere one and a half, two centimeters less than the diameter of the disc itself.
- Next, you should decorate it and glue it from the front of your product..


For a younger toddler, for example, first grade, you can use the following Shrovetide decoration idea. It will be very good if several children make such suns at once, and adults already decorate the chandeliers and the ceiling in the classroom with crafts..
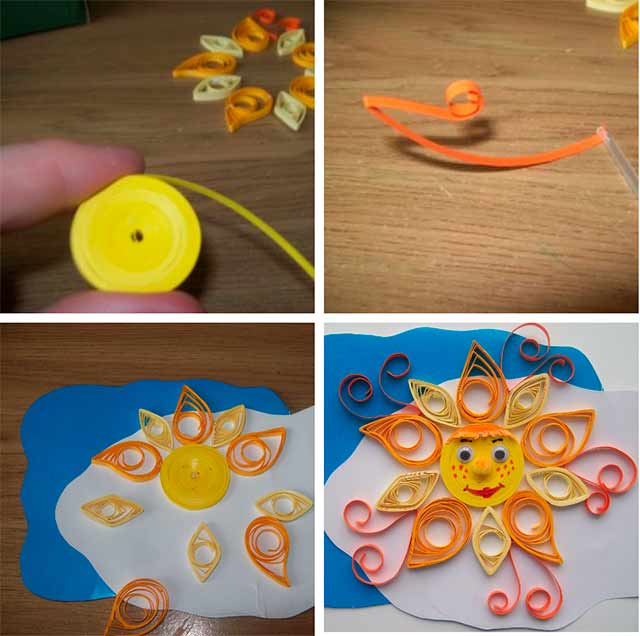
For older children, and for those who are fluent in the quilling technique, a master class on manufacturing will be relevant. The sun is made of multi-colored curls. To do this, you need to prepare:
- Colored quilling paper 3mm (can be cut by yourself).
- Colored paper for the background: blue or white.
- PVA glue.
- Plastic eyes and pom-pom nose.
- Quilling tools.
Progress:
- It is necessary to twist the rays in the form of droplets and eyes. The number and size will depend on the size of the sun. Next, you should make a dense roll-sun.
- Then it is worth forming curls. To do this, you need to bend the tape not in the middle, but with a slight offset, and twist the ends slightly.
- Cut out the background in the form of small clouds from blue and white paper. Parts of your craft should be glued onto them..
- The very final touch in your work will be making the face of the sun..

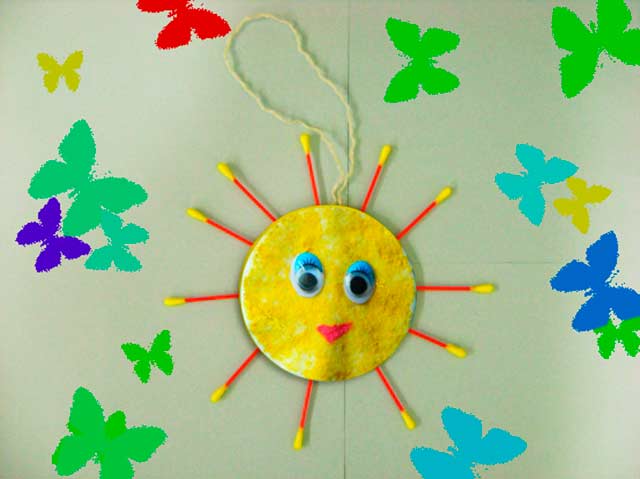
Sunny in two minutes
For little kids, a simple option with the sun in the form of a dyed cotton pad and simple ray sticks may be suitable. By fixing this craft on a straw or wooden stick, you can install it in a flower pot..
Maslenitsa doll made of cotton pads
If you are interested in DIY carnival crafts for children, then take a closer look at our ideas. A young child can easily make an oil doll. It will consist of half of cotton pads and cotton swabs. To make a doll, you will need:
- two cotton pads.
- two cotton swabs for the cross-base of the future doll.
- glue.
- plastic ball (you can use any other. For making a head (from cotton wool).
- gold and blue paint.
- buttons or other material for decorating crafts.
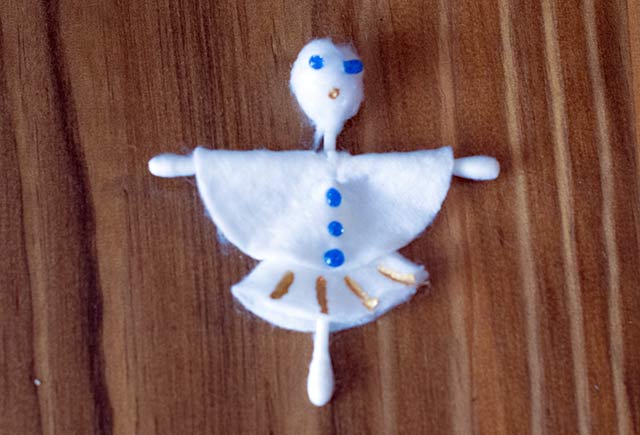
Progress:
- First you need to twist the cotton on a stick, so that you get a head.
- Next, you should attach another cotton swab, so that your doll has handles.
- Then you need to assemble the base for the doll and fix it with glue..
- Next, you need to form a skirt and a blouse..
- The final touch of your work will be the design of the doll’s face using gold and blue paints.
Shrovetide made of paper and cotton pads
Do not know how to make a crafts for Shrovetide with your own hands, then take a closer look at our ideas. You can use cotton pads as an applique for making a paper carnival. For this simple job you will need:
- PVA glue.
- colored paper of three colors.
- ruler.
- scissors.
- cotton pads.
- wool thread for hair.
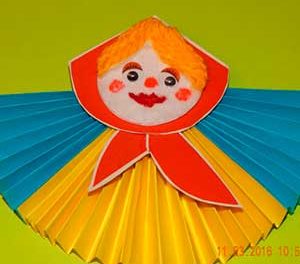
Progress:
- You must first fold sheets of colored paper in the form of an accordion, and bend in half.
- On the lowest accordion, a corner should be made that will not allow it to disperse.
Next, you should glue the accordions.
- It is best to use PVA glue. Then you need to cut a scarf out of red paper.
- Next, take one cotton pad and leave it for the doll’s face. From the second disk, you need to cut out the bangs and stick the threads on it. Further. you need to make a face and stick it to the scarf. All this should be attached to the accordion..


Options for simple crafts for Shrovetide in kindergarten
Even a small child can do needlework. And even more so, in kindergarten with the beginning of the oil week they start, various competitions and exhibitions are held. Surprisingly, it is the children who can make the most unusual crafts from various materials..
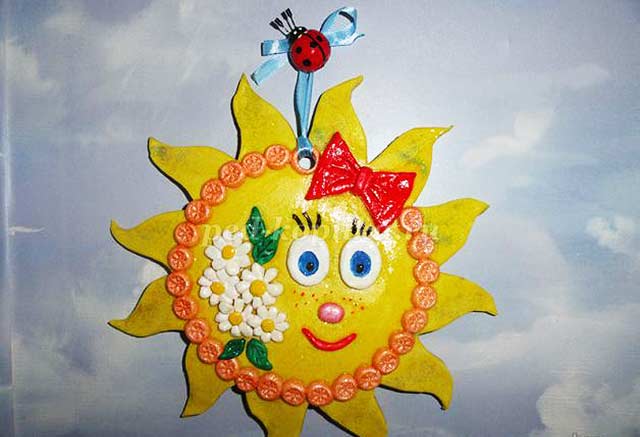
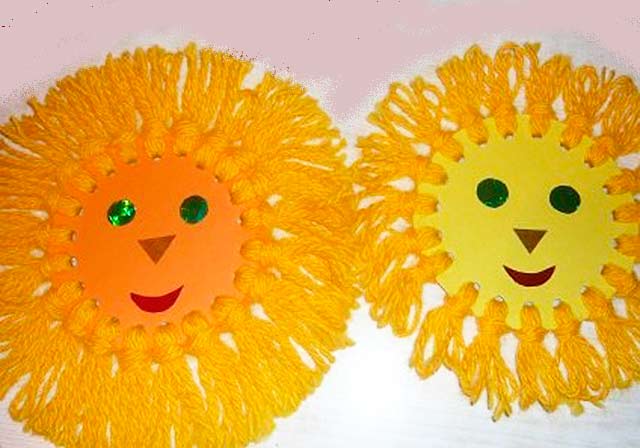
How to make a craft sun for kindergarten?
You can diversify a simple-looking paper sun by adding rays of an unusual shape to it. To do this, you just need to make holes along the edge of the yellow circle, threading pieces of colored cardboard or paper there. Satin ribbons will also look beautiful. Woolen threads can also revive this simple children’s craft, and make it more voluminous. Together with your child, you can make a sun with the rays of the handprints. To do this, you will need:
- PVA glue.
- Cardboard round base with a diameter of twenty-five centimeters.
- Scissors.
- Multi-colored buttons, beads or other decorations.
- Bright orange watercolor or gouache for handprints.
- DIY fastening tape.
Progress:
- While you are measuring and cutting a round base, you can instruct your baby to paint over one palm and make a print on paper. For a sun with a diameter of 25 centimeters, you will need about fifteen pieces.
- Next, you need to cut the prints together along the contour. Then, together with your child, glue them along the edge of the circle from the wrong side. And then decorate the resulting craft at your own discretion.
- You can make similar Shrovetide crafts in a slightly different version. Just trace the baby’s hands on colored paper and cut them out. Then glue your palms to the base. It can be a regular plastic plate. And you can place the rays at different levels. Then your craft will turn out to be more voluminous..
- You can also make the original version of the sun from cardboard, ribbons or plasticine. Shrovetide is the time for delicious treats. So why don’t the girls get busy making doll pancakes made from salted dough? It can also be used to make other goodies..
Scarecrow for Maslenitsa – how to make a craft with your own hands
We are coming to the end of this publication. And you already know what kind of craft to make for Shrovetide. But that is not all. Scarecrow for Shrovetide is the main attribute of the wire of winter. A small, miniature-sized version of such a composition may well be an independent craft. If you have an unnecessary doll lying around somewhere, it will be easiest to dress it up appropriately. And that’s it! Consider the job done!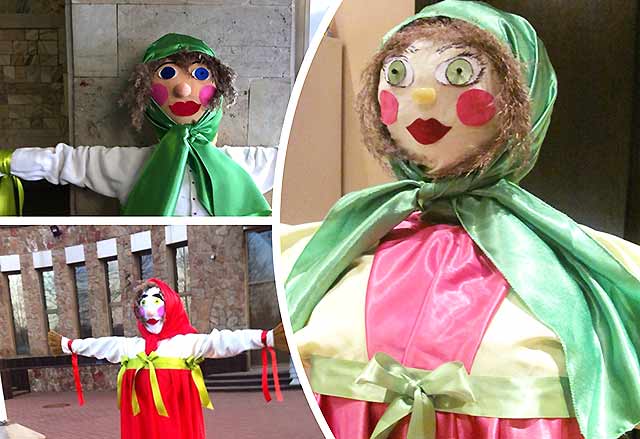
Or you will need to make a cruciform base. For these purposes, two stuck wooden sticks may work best. They can be replaced with ordinary cardboard glued in three, four layers, or made of rigid plastic tubes. As a rule, the body of a future doll made of straw or hay is attached to the frame. In our version, a simple dry grass will do. If you do not have this material, then you can use cotton wool to create a doll, wrapping the base with strips of fabric. From them, you can easily form the head of the doll. To make an outfit, it is better to use small pieces of fabric with prints and patterns in the folk style..
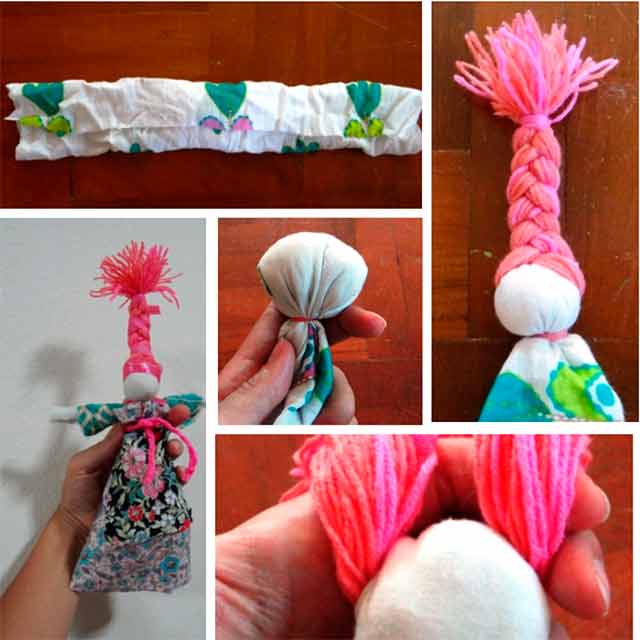
Amulet doll
In the ancient culture of our ancestors, there were many amulet dolls. With the arrival of spring, the girls were presented with spring dolls as a gift. It’s very easy to make them yourself. To do this, you will need:
- threads for braids.
- scraps of fabric for hands, body, apron and dress.
- cotton wool.
- head decoration ribbon.
Progress:
- First, fold the body flap with a roller. Next, you should fold it in half, placing a small piece of cotton in the center, and bandage it. You get your head.
- Then you need to thread the doll’s braid under the fold of the head. And weave a braid.
- The hand cloth should be rolled into a roller. You can also press on the sleeves to it. Pass your hand through the fold of the doll’s body and secure with threads. You need to tie an apron on top and a belt on top of it. Decorate the doll’s hairstyle with a bright ribbon.