

Every girl loves jewelry very much, and if they are created with their own hands, then their value is indescribable. Thanks to a few basic bracelet-making techniques, which you will learn below, they will help you make a unique piece of jewelry in just a few minutes, and the result will cause admiring glances. In addition, any thing that you do with your own hands and with love can be presented to a loved one..
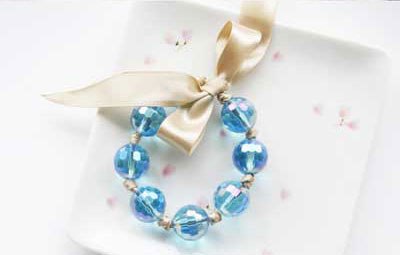
Simple bracelet
To make an original bracelet with your own hands you need quite a bit:
Any beads you like. The size can be the same or different at will.
Silk or satin ribbon.
Scissors.
Fire (candle, matches, lighter).
We take a tape of the required size, cut it off and carefully singe the ends of the tape in order to exclude the possibility of unraveling the tape..
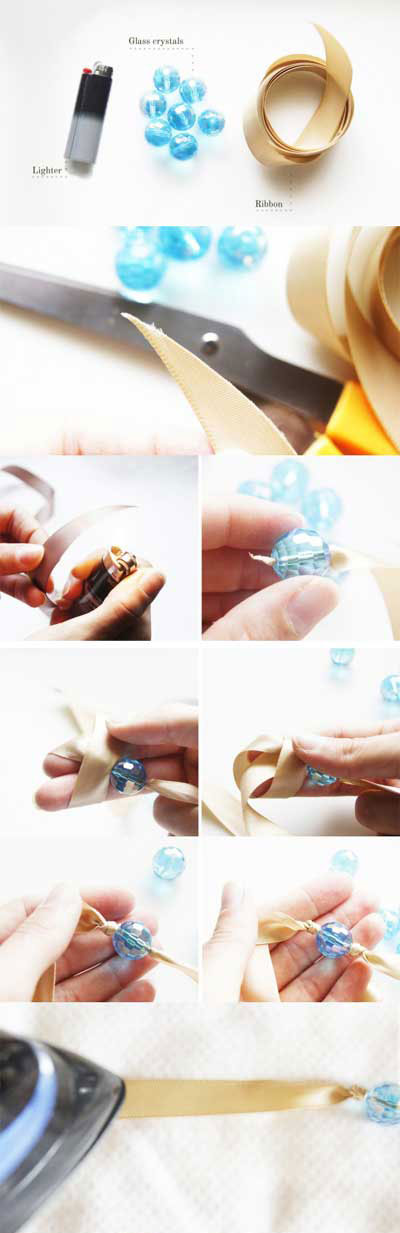
Then we string the selected beads onto the ribbon and tighten the knots tightly on both sides. If your beads are of different sizes, then it is better to alternate them after one or two. We continue to put the beads on the ribbon until they run out, and you will not get a great bracelet of the required size.
Experimenting with different shapes and colors, both beads and ribbons, you can create many bracelets using the same technique, but radically different from each other..
Bracelet made of threads
Another way to make an original bracelet, for which you need to take:
Any ribbon or rope, you can use thread for knitting.
 Simple DIY bracelet
Connecting ring.
Sewing needle.
Scissors.
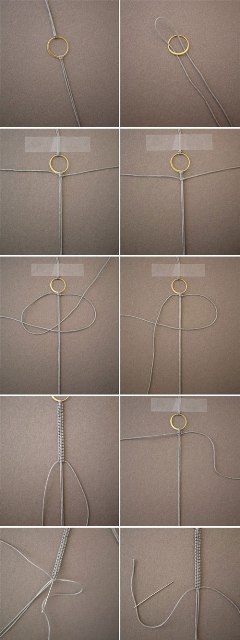
The first thing to do is cut the selected material into 5 pieces. Two 75 centimeters, two 50, and one 25 centimeters.
Parts that are 50 centimeters long must be folded in half and inserted into the connector from different sides, then tightly tied in a knot.
 Master class on how to make a simple bracelet
Fold the part of the cord, the length of which is 75 centimeters, in half and mark the middle. We put the marked part under one of the threaded cords, tie a knot and start weaving a bracelet. It is necessary to continue weaving until the desired length is braided. It is important to tighten the knots very tightly..
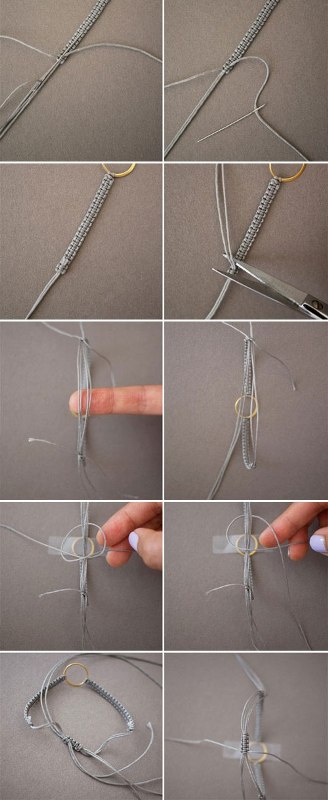
To finish weaving, you need to thread one end of the cord through a hand needle and thread it through four made weaves (knots). If this is difficult enough, you can use pliers. Next, you should pull out the needle, thread the second end of the cord into it and do the same. The cord can be cut while leaving small ponytails.
The same should be done on the second part of the bracelet. After all the manipulations, you need to make a circle and slightly fasten the ends of the cord together..
Part of the cord, the length of which is 25 centimeters, will be needed at the final stage. From it you need to weave knots on the back of the bracelet, as was done in the previous steps..
After you have braided a little, you need to release the ends of the cord that were temporarily connected and fasten them, the ends must be cut.
Stylish beaded bracelet
Beads are back in fashion, so we bring to your attention a method of making stylish jewelry from threads and beads. If it is slightly modernized, then ribbons and beads can be used. It all depends on your imagination..
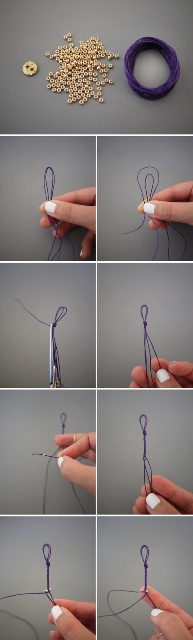
For manufacturing you will need:
Beads or beads.
Threads.
Scissors.
Well suited for this method of thread, which are used for embroidery – floss. You need to take two threads of the required length, fold them together, bend them in half and tie a knot at the top so that you have a loop. Four ends of the thread come out from the knot, one of them needs to be cut off closer to the knot.
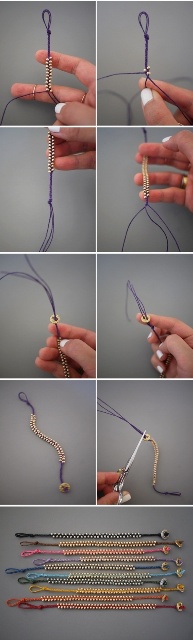
From the remaining three threads, you can start weaving with a regular braid. So keep weaving until you have weaved a few centimeters..
Next, we begin to put on one bead on the side threads and continue weaving using the pigtail method. When the desired length is reached, you need to fasten the ends of the bracelet and make a clasp.
Useful video: Simple MK beaded bracelets
Original and stylish bracelets, which are simple to perform, highlight your individuality or become a wonderful gift.