

DIY Easter crafts from fabric: baskets
If you have scraps of fabric or colored scraps at home, do not rush to throw them away. Modern needlewomen have found use for everything, and in this article you will learn how to make beautiful baskets from fabric. Surprisingly, luxurious Easter baskets can be made even without special sewing skills. Choose a suitable master class and follow our instructions.
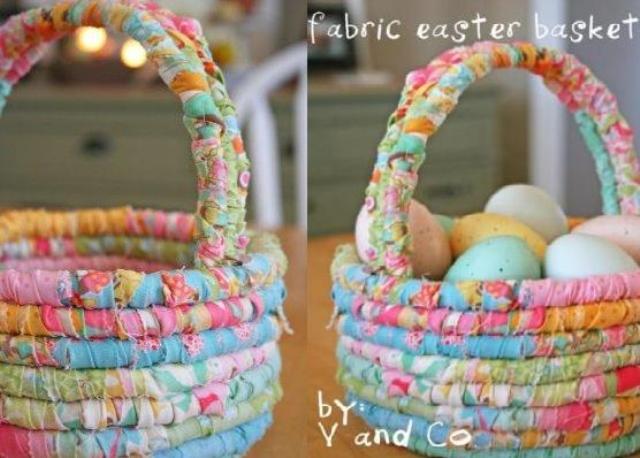
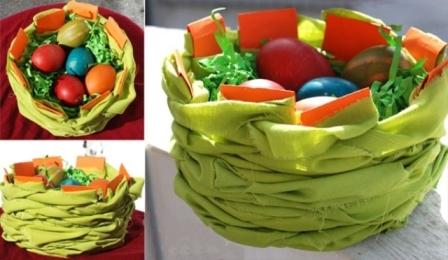
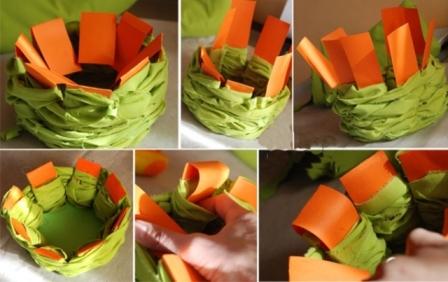
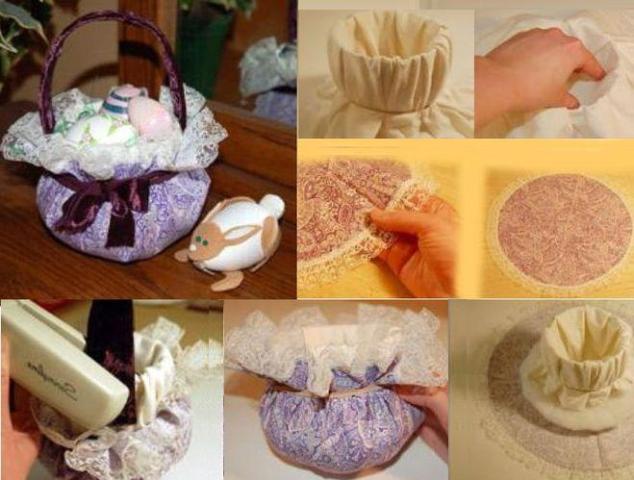
Basket made of fabric and cord
Materials:
– rope;
– threads;
– scraps of fabric;
– sewing machine.
Master class on Easter baskets made of cord and fabric
1. It is most convenient to use identical pieces of fabric. So make them all the same width, about 7-10 cm..
2. Fold the two pieces together and sew on one side.
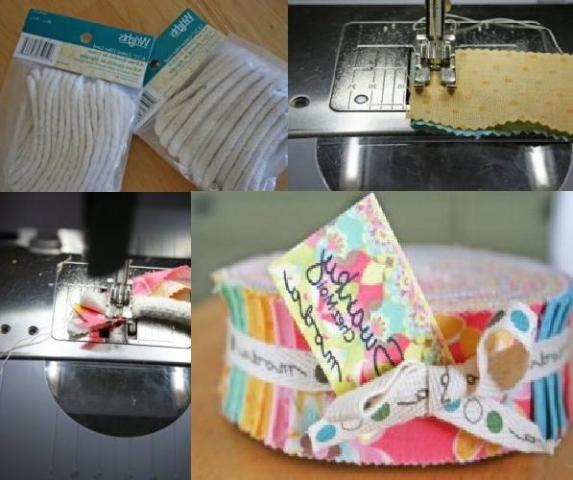
3. Now you need to sew in the cord. To do this, fold the segments along and insert the rope into them..
4. Wrap the cloth around the rope several times. When the strip ends, sew the next one. It is best to sew the lengths off gradually so that they can be easily wound onto the rope..
5. The cord will look original if you use pieces that are in harmony in color. The cord should turn out to be long enough, since we will twist it from it easter basket.
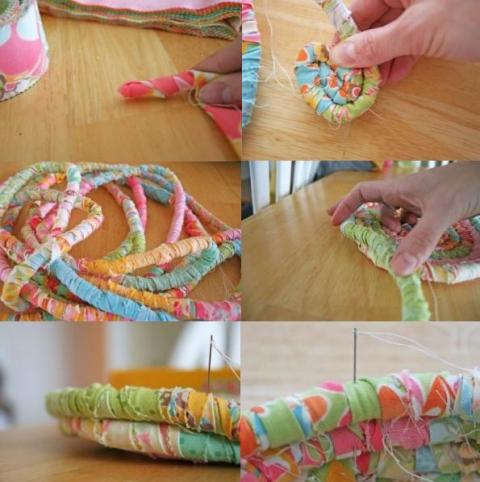
6. We start at the bottom of the basket. To do this, we twist the resulting cord into a spiral and sew it with a thread. Try to do the job neatly so that the stitches are not visible. Sew firmly enough to make the basket sturdy..
7. Form the wall of the craft. To do this, slightly raise the rope and place it on top of the last turn of the base..
8. Sew new turns with the previous row.
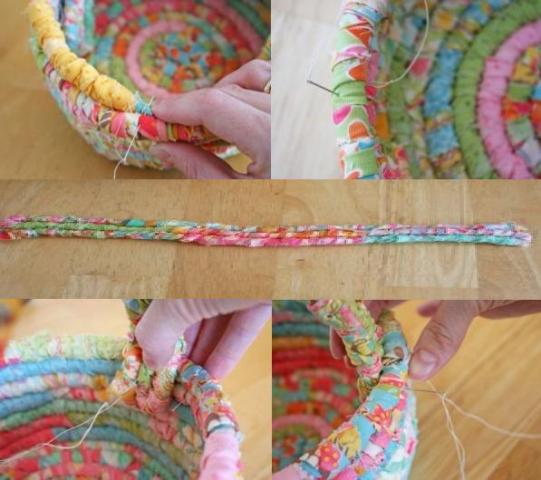
9. The end of the cord is sewn into the inside of the basket.
10. The handle of the basket is made from another piece of rope. We also wrap it with cloth and then fold it in three so that the handle is strong. Now all that remains is to sew on the handle.
Cardboard basket with cloth
Materials:
– colored cardboard;
– glue;
– scissors;
– old clothes or scraps of thin fabric.
Patchwork basket master class
1. Prepare the base for the basket out of cardboard. To do this, cut out 4 strips of the same length and width. We fold them crosswise.
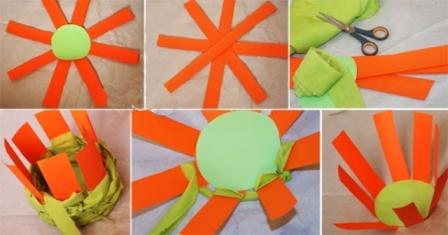
2. Cut a circle out of cardboard and glue it at the intersection of the stripes. The dimensions of the finished craft directly depend on the size of the stripes and the circle.
3. Wait for the base to dry and lift up the strips of paper.
4. Cut the fabric into strips and start weaving.
5. You need to braid cardboard strips around, without tightening too much.
6. Don’t go to the end. Fold the strips and insert them into the resulting fabric pockets.
Also read: DIY crafts for Easter
Easter basket from a plastic bottle
Materials:
– plastic water bottle;
– fabric, lace, ribbons;
– scissors;
– glue;
– foam rubber;
– wire or twine;
– stapler.
Master class baskets from a plastic bottle and fabric
1. From the bottle you need to cut off the bottom part, it will become the basis for the basket. Also, cut out a ring 2-4 cm wide from the bottle – this is the future craft handle.
2. Take a square piece of pastel-colored cloth and wrap it around the bottle. At the bottom, secure the fabric with wire.
3. Cut out a circle from another piece of fabric so that it wraps the bottle when lifted up. It is advisable to use fabric with lace or sew lace on top separately.
4. Cut a circle with a diameter slightly larger than the bottom of the bottle out of the foam..
5. On the wrong side of the circle from item 3, place the foam rubber circle in the center and place the bottle on top. Fold the edges up and secure with wire, tape or string.
6. We make a handle from a plastic blank. Cut the appropriate strip out of the fabric. Cover the handle with glue and wrap the material gently.
7. You can either sew the handle to the basket or fix it with a stapler. Additionally, we recommend decorating the craft – a basket with ribbons, flowers or beads.
Read more about Easter crafts HERE
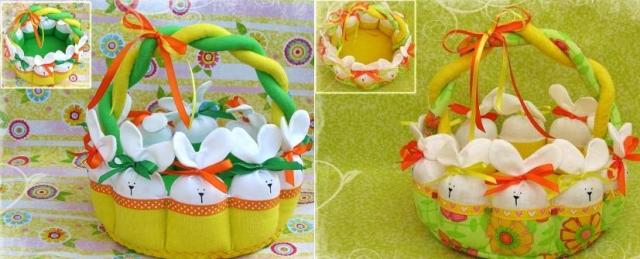
Easter basket with bunnies
Materials:
– fabric of different shades;
– scissors;
– pencil and cardboard;
– synthetic winterizer;
– threads;
-acrylic paints;
– braid, ribbons, lace;
– sewing machine.
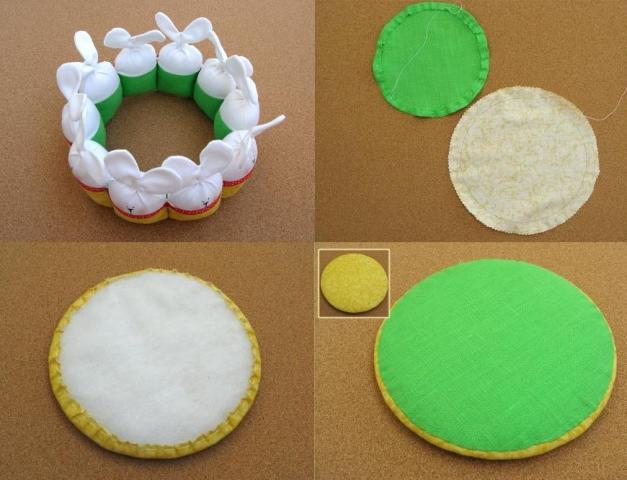
Bunny basket making workshop
1. We cut out strips from the fabric: 2 pieces measuring 10 * 73 cm for the upper part of the bunnies (preferably white or milk fabric), 2 pieces of different colors, measuring 7 * 73 cm for the lower part of the hares, 2 pieces of different colors, measuring 5 * 55 cm – for pens. Leave an allowance of up to 0.6 cm for each strip.
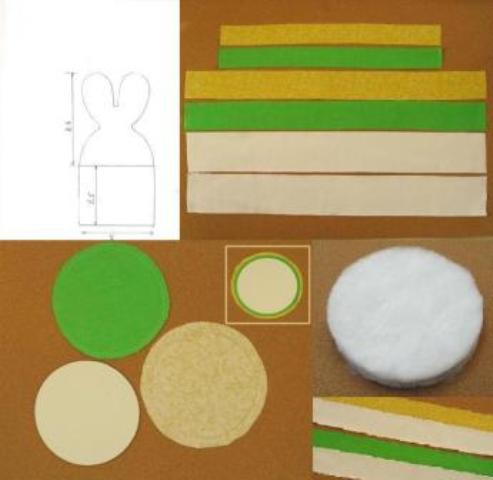
2. Draw a 19 cm circle on the cardboard. Cut and attach to the fabric that will be on the outside of the basket. Make an allowance of 2.5-2.6 cm.
3. Transfer the same circle to the inner fabric, making an allowance of 1-1.5 cm.
4. Cut two of the same circles out of padding polyester. Using PVA, glue the synthetic winterizer on both sides on a circle made of cardboard and press down. After drying, align the edges, but so that the cardboard is not visible.
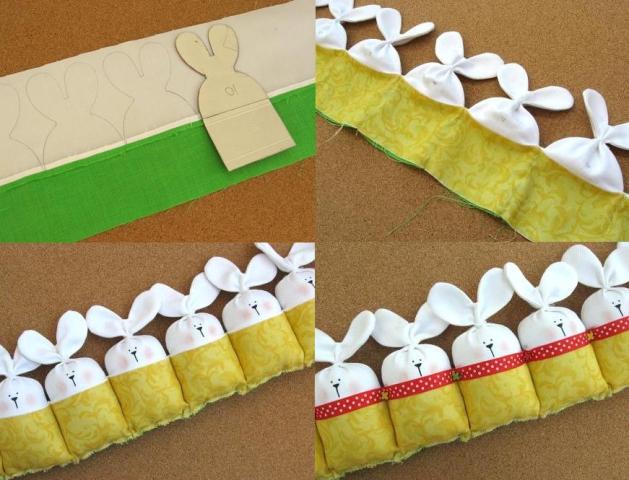
5. Sew the stripes: top of the hare + bottom of the outer fabric and the top of the hare + bottom of the inner fabric. Iron the resulting strips well and connect with the front sides..
6. According to the template, cut out bunnies from cardboard and transfer them to the fabric. Leave a gap of 2-3 mm between each bunny so that it is easy to turn them out in the future. All 10 bunnies should fit on the sewn strip. Cut out their heads neatly, leaving a little space, about 2-3 mm, so that the seam does not come apart.
7. Sew the bunnies along the drawn line, and also make lines between them..
8. Turn the blank out and start drawing the face. Use a pencil to mark where the nose and eyes will be. You can decorate with acrylic paints, the main thing is to do it very carefully so as not to smudge and all the bunnies look the same. Blush can be added with eyeshadow or blush.
9. After drawing, we tie the ears with a thread..
10. We fill each bunny with a padding polyester or some other filler.
11. Baste the bottom stitch after filling the bunnies tightly.
12. The seam that connects the upper and lower parts of the hares can be closed with braid or a beautiful ribbon.
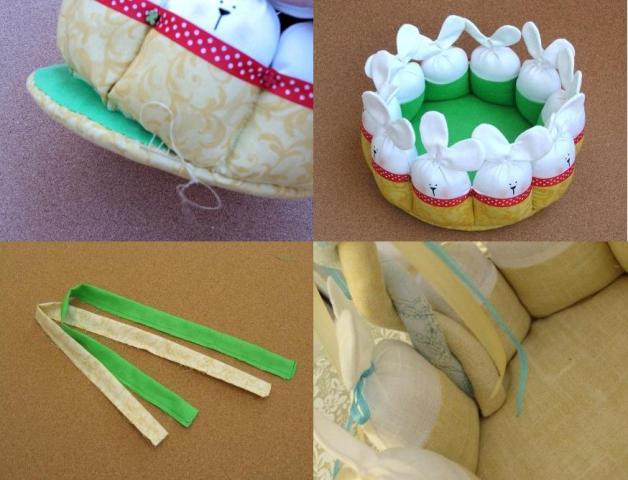
13. Sew the finished bunnies in a circle with a blind seam.
14. We return to the cut out circles in clauses 2 and 3. On a large piece made of outer fabric, we lay it almost near the edge of the stitch. On a smaller circle, turn the allowance and sew with basting stitches.
15. Put a padding polyester circle on a large circle and tighten the basting thread. We put an inner circle on top and sew it with blind stitches.
16. Now we seat our bunnies on this stand and sew. The seam can also be decorated with a ribbon, lace or braid.
17. Let’s start making pens. To do this, take the strips cut out in step 1, fold them in half and sew them at a short distance from the edge. Sew a cut on one side and turn out the finished strip.
18. Fill the strips with padding polyester and sew the edges. Now weave the strips together and sew them together to create a more stable structure. Finished handles can be glued with a glue gun or sewn on.
19. It remains to decorate the finished basket with colorful ribbons.
Watch a video on the topic: Crafts from fabric – baskets for Easter
On our site you can always find many new and interesting crafts that you can easily do with your own hands..